Heater Error Codes


E1

An E01 error code is visible if there is an issue with the water flow sensors in the pool heater.

Step 1 – Check that the heater pump is set up correctly

Hose from ‘A’ to the pool heater

The arrow on the heater is facing the filter pump

Hose goes from heater into filter pump

Hose from filter pump goes into ‘B’

Step 2 – Check the filter pump

We recommend checking the filter pump troubleshooting here.

If the above steps do not fix the problem the water sensor on the heater may have broken. Please contact our Customer Care team for further support on this.


E2

This error code is visible if there is an issue with the temperature of the water. This code will show if the water or ambient air temperature drops below 4°c.

These pool heaters are not designed to operate below 4°c. We recommend you disconnect/ unplug the pool heater and place it in a warm environment to allow the internal parts to warm up. Once warm, place the heater back on the pool ensuring the water is above 6°c.


E3

This error code is visible if there is an issue with the temperature of the water. This will show if the water or ambient air temperature reaches above 50°c.

The heater is not designed to operate in temperatures above 50°c. Please disconnect the pump, place it in a cool environment out of direct sunlight to allow the internal parts to cool down. Once cool, place the heater back on the pool ensuring the water is below 38°c.


E4

This error code is visible if there is an issue with the water flow sensors in the pool heater.

As this error code is visible once there is an issue with the internal parts you will need to contact us below. Please do not attempt to open up the pool heater and resolve this issue.


E5

This error code is visible if there is an issue with the thermal cut-out on the pool heater and this requires to be reset.

To do so push the reset button on the pool heater. If the alarm is still visible button section on the pool heater manual. If this does not resolve the issue please contact our Customer Care team below.


E6

This error code is visible if there is an issue with the fuse within the pool heater. Please do not attempt to open up the pool heater, change the fuse or aim to resolve the issue. Please contact us below for more advice from a member of our Customer Care team.


No power

This is normally caused by an electrical issue. Please ensure that your pool heater is plugged directly into a mains socket and not into an extension lead.

If plugged into a mains socket check the socket with other items to ensure the problem is not with the socket itself.


Water Flow issues

If you are experiencing water flow issues we recommend checking the water flow troubleshooting for your pool filter pump here.


Not heating

Step 1 – Check the filter pump

A problem that can cause this is an incorrect filter pump. We recommend checking the filter pump size and that it is connected properly.

Step 2 – Check pool and heater compatibility

The heater may be too small for the pool. Compatibility information can be found in the product manual.


Heater light not working

Step 1 – Check power supply

Ensure no extension leads are being used to power the heater.

Step 2 – check for a problem with the filter pump

We recommend checking the flow through the filter pump first to see if this is causing the problem.


Leaking water

Check the hose connections. Ensure that the O-ring is correctly and securely in place.


If the above troubleshooting steps do not resolve the issue please contact our Customer Care team below.


No power

Normally this is caused by an electrical issue. Please ensure that the filter pump is plugged directly into the mains socket and not an extension lead. Please check the socket with other items to ensure this is not an issue with the socket itself.


Water flow issues

Step 1 – Check control valve

Make sure the control valve is set to correct position.

Step 2 – Check for any blockages

We recommend following this checklist to check for any blockages which may be affecting the water flow through the pump.

Check the debris screens are clean and unblocked

Check the pipes are clean and unblocked

Check hose clamps are attached correctly and are not restricting the water flow

Make sure the stopper plugs have been removed from the pool

Make sure the strainer is clear from debris


Pressure is too high

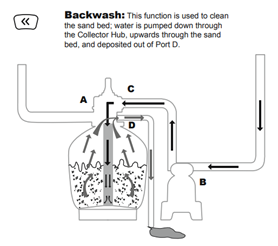
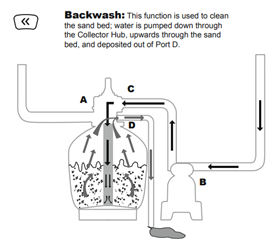
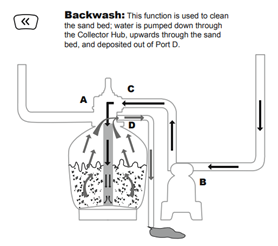
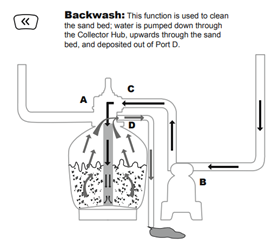
Normally this is caused when the item is not regularly cleaned or maintained. Back flush the unit and replace the sand.

How to back flush:

  • Turn power off (important, should not run the pump dry, will cause damage to pump)
  • Close Port A using cap (switch from Port D to Port A basically)
  • Attach hose to Port D
  • Put the control valve to backwash position (<< symbol)
  • Turn pump on until water turns clear (or around 3-5 mins)
  • Turn pump off once water turns clear
  • Remove old sand and refill, or rinse existing sand (water droplet symbol – rinse for 1 min)
  • Once complete, remove cap from Port A and apply to Port D


Control valve is leaking

Step 1 – Has the control valve been set between 2 different functions

If this is the case please set the control valve to just 1 function only.

Step 2 – Check if the gasket is broken.


Connections are leaking

Step 1 – Check if hoses are out of place.

If this is the case please realign any out of place hoses.

Step 2 – Are the adapters attached correctly?

We recommend to check the adapters are securely fastened.

Step 3 – Are the couplings out of place?

Check the positioning and if they are out of place realign couplings.


Casing is leaking

If the pump casing is leaking this means that the seals are either broken or out of place. Check and realign the seals.


Pool water is dirty

If the pool water is dirty this could be due to blockages stopping the pump from working correctly. We recommend checking the following to resolve this:

Step 1 – Check debris screens are clean and unblocked.

Step 2 – Check running time of pump and increase running time if necessary.

Step 3 – Check your chemical usage.

If you need further chemical advice we recommend using our helpful chemical guide here.


Sand in pool

We recommend completing the following steps to diagnose and resolve the issue causing sand to appear in your pool.

Step 1 – Is the sand being used too small?

The recommended is 0.45mm to 0.85mm #20 Silica Sand.

Step 2 – Move the control valve and perform the back flush to the filter function without stopping the sand filter

Turn off power to the Sand Filter (on/off switch on the pump) as changing the setting whilst running can cause damage to the pump; each setting will control the water flow differently.

Step 3 – Is the skimmer broken?

If this is the case we recommend replacing the skimmer.

Step 4 – Check if the level of the sand is too high

Check the level of the sand is between min and max lines

Step 5 – Has a back flush and rising been performed?

If not, perform the back flush and rinsing procedure. This is especially important to do when the sand is new.

How to back flush:

  • Turn power off (important, should not run the pump dry, will cause damage to pump)
  • Close Port A using cap (switch from Port D to Port A basically)
  • Attach hose to Port D
  • Put the control valve to backwash position (<< symbol)
  • Turn pump on until water turns clear (or around 3-5 mins)
  • Turn pump off once water turns clear
  • Remove old sand and refill, or rinse existing sand (water droplet symbol – rinse for 1 min)
  • Once complete, remove cap from Port A and apply to Port D


Excessive filter pressure

Step 1 – Is the filter dirty?

If this is the case please perform back wash and rising procedure.

How to back flush:

  • Turn power off (important, should not run the pump dry, will cause damage to pump)
  • Close Port A using cap (switch from Port D to Port A basically)
  • Attach hose to Port D
  • Put the control valve to backwash position (<< symbol)
  • Turn pump on until water turns clear (or around 3-5 mins)
  • Turn pump off once water turns clear
  • Remove old sand and refill, or rinse existing sand (water droplet symbol – rinse for 1 min)
  • Once complete, remove cap from Port A and apply to Port D

Step 2 – Has the sand bed calcified?

This is rare to happen as long as you are regularly rinsing the sand/backwashing the pump. It means that the sand clumps together and forms hard rocks so it can’t be filtered correctly. We recommend inspecting the sand and change if required.

Step 3 – Insufficient backwash

If after 3-5 minutes after the backwash procedure the water is still not running clear, repeat the process again. If you are struggling to get the water to run clear we recommend changing the sand all together.

Step 4 – Check if the pressure gauge is broken.


Control valve is blocked

Step 1 – Check if the washer is in the correct place on the connectors

If they are in the incorrect place amend this so they are. Check if this resolved the problem.

Step 2 – Check if the hoses are loose

If they are we recommend tightening up the hoses and check if this resolved the issue.


Warning sign is bleeping

Step 1 – Is the filter dirty?

If it is we recommend completing the back flush procedure.

How to back flush:

  • Turn power off (important, should not run the pump dry, will cause damage to pump)
  • Close Port A using cap (switch from Port D to Port A basically)
  • Attach hose to Port D
  • Put the control valve to backwash position (<< symbol)
  • Turn pump on until water turns clear (or around 3-5 mins)
  • Turn pump off once water turns clear
  • Remove old sand and refill, or rinse existing sand (water droplet symbol – rinse for 1 min)
  • Once complete, remove cap from Port A and apply to Port D

Step 2 – Check if the control valve is set to filter function

The control valve will need to be set to the filter function to stop the warning sign bleeping.

Step 3 – Check if the hoses are broken

Step 4 – Is there a water flow?

Go through this checklist guide:

  • Stopper plugs removed
  • Control valve set to closed
  • Strainer blocked

If this checklist does not resolve the problem the pump will need replacing. Replacements can be purchased here.


If you need any further assistance please contact our Customer Care team below.


No power

Normally this is caused by an electrical issue. Please ensure that the filter pump is plugged directly into the mains socket and not an extension lead. We recommend also checking the socket with other items to ensure this is not an issue with the socket itself.


Water flow issues

Step 1 – Make sure hoses are clear from any blockages and water is not being restricted by tight connections.

Step 2 – Make sure the stopper caps have been removed and ensure the debris screens are clear.

Step 3 – Check the filter cartridges in the pump are clean or replace them.

Step 4 – Purge any air from the pump pipes which could be preventing a waterflow.


Leaking water from the top of the pump unit

If this issue occurs this means the seal is not aligned correctly. Check the placement of the seal to ensure this is in the correct place.


Noisy filter pump

Step 1 – Check for air trapped in the pump.

Perform air purge operation which removes the build up of air that should not be there from the pipes.

Open/unscrew the Air Purge Valve on the top of the Filter Pump; air is released as water fills the Filter Pump.

When water comes out of the Air Purge Valve screw it closed and wipe away any water.

To start the Filter Pump, insert the plug.

Step 2 – Check if the filter cartridge is dirty

The filter cartridge in the pump may need to be cleaned or replaced.


Leaking water from top ring

Step 1 – Check filter cartridge is correct size

Check the size of the filter cartridge being used and replace with correct size. The size you need should be on the box the pool arrived in.

330gal pool – size I

530 & 800 gal pool – size II

1500 gal pool – size III

2500 gal pool – size IV

Step 2 – Check filter cartridge is positioned correctly

Check the position of the filter cartridge and align if necessary.

Step 3 – Check the filter cap seal is aligned incorrectly

Check the position of the filter cap seal and realign if necessary.

Step 4 – Check if the filter cap seal is damaged


Leaking water from purge valve

Step 1 – Check if the purge valve is missing.

Step 2 – Check if the purge valve is loose.

If it is we recommend tightening the purge valve.

Step 3 – Check if the cap seal is damaged.


Leaking water from hose connections

Step 1 – Check if the hose seal ring is missing.

Step 2 – The clamp is not tightened correctly.

If it is we recommend tightening the clamp correctly.


Pool water is dirty

Step 1 – Check if the filter cartridge is dirty

If it is clean the filter cartridge. If this isn’t possible replace the filter cartridge. This will need to be replaced every 14 days/ uses.

Step 2 – Is the filter pump smaller than the one required for your pool?

If this is the case the pump will not be cleaning your pool correctly. We always recommend checking the compatibility of pools and filter pumps.

Step 3 – Is the operating time of the filter pump under 10 hours a day?

If this is the case we recommend increasing the operating time of the filter pump.

Step 4 – Purchase some chemicals

We recommend purchasing some chemicals to support the use of your filter pump. If you need further chemical advice we recommend checking our chemical guide here.


If you need any further assistance please contact our Customer Care team below.

What type of pump are you using with your pool?

Filter pump troubleshooting Sand filter pump troubleshooting

Top ring air valve is deflating

Inflate the air chamber and securely close the valve. Wipe around the valve with soapy water to determine whether there is an air leakage. If you discover there is an air leakage, follow these simple steps:

Step 1: Deflate the top ring by opening the valve.

Step 2: Prepare some hot water over 80ºC (176ºF) and place the valve inside the water for approximately 1 minute (we suggest wearing kitchen gloves during this part of the process to protect your hands from the heat of the water).

Step 3: Wait until the valve has cooled. Once cooled, it should have recovered to its original shape. Repeat the test to ensure the valve is no longer leaking air.


Misshapen top ring

Step 1: Check if pool is placed on uneven ground:

Make sure the pool is setup on level ground surface so the pressure from the water is equal throughout the pool liner.

Step 2: Check that the pool is full:

The pool will need to be filled to 80% capacity.

Step 3: Check for over exposure to sunlight:

Over exposure to sunlight can cause the top ring on fast set pools to expand and become deformed. The fast set pools should not be placed in direct sunlight, unfortunately this is not covered by manufacturers warranty.


If you need any further assistance please contact our Customer Care team below.


Misshapen pool frame

The most common cause for this is the pool is not set up on flat level ground. We would suggest moving the pool to a different site and setting up again. Leaving the pool on uneven ground can cause a lot of pressure to build on parts of the pool which could cause it to collapse.

Please make sure the pool is not setup on gravel, sand, chippings or other uneven ground types. This type of damage is not covered under the manufacturer’s warranty so you may need to replace parts.


Bent poles

This is often caused either by the pool not being set up on flat level ground or someone standing or leaning on the frame of the pool. We would suggest moving the pool to a more suitable location. We would also advise that you do not stand on the frame of the pool, the ladder must be used for entering and exiting the pool. This type of damage is not covered under the manufacturer’s warranty so you may need to replace parts.


Pool frame bending inwards

This is normal. The pool will bend inwards until the pool has been filled up to 80% capacity. Please see the pool manual for more detailed information and images.


Rusty frame

The frame is covered in a rust resistant coating in order to avoid this. Please make sure the poles are completely dry when they are stored. Any damage to the poles such as scratches or bent parts can cause coating to crack causing rust. This advice also applies to pool ladders.


Poles stuck to pool liner

Please try to remove as many poles as you can from the liner. Photograph any damage to the liner and poles. You will need to contact our Customer Care team below for further assistance with this issue.


If the above troubleshooting does not resolve the problem, please contact our Customer Care team below for further advice and they will assist you further. If you are no longer within your warranty period replacement parts can be purchased here.

If you are experiencing any of the below with your pool liner we recommend running through the relevant troubleshooting steps:


Pool liner is punctured

Please note: Punctures are not covered under the manufacturer’s warranty.

To locate a puncture on a pool liner we recommend applying diluted washing up liquid from a spray bottle to the surface of the entire liner and around the inflation valve. Bubbles will appear where the puncture is located.

To fix a puncture you will require a repair kit. We would suggest using a waterproof repair patch or epoxy vinyl glue.


Pool liner is leaking

A pool liner could be leaking for several different reasons. Let us run through the troubleshooting steps to resolve this for you as soon as possible.

The first thing to check if you suspect the liner is losing water is to monitor the water level by filling it to the maximum line and gauging how quickly it drops. 

Step 1: Check if pool is placed on uneven ground

Make sure the pool is setup on level ground surface so the pressure from the water is equal throughout the pool liner. Also, check for any debris or sharp objects which could cause harm.

Step 2: Check drainage plug or filter pump connection:

There could be an issue with the drainage plug causing the leak. If this is the case we recommend contacting the Customer Care team below.

If the pool has a filter pump we suggest checking the hose connections to make sure they are sealed correctly.

Step 3: Check for a split seam:

If the seam has come part, this can be difficult to fix with repair patches. If you are still within the warranty period, please contact the Customer Care team below to process a warranty claim.


Pool liner is bulging (Fast Set pools only)

If you can see your fast set pool liner has started developing a bulge, we recommend deflating the pool slightly. Please be aware that changes in the ambient air temperature outside will cause the air inside the liner to expand or contract. On hot, summer days we would suggest deflating the pool ring slightly. On colder, winter days you may notice the liner looks a little soft and needs some more air.


Pool liner discolouration/ fading

Products such as washing detergent, moisturiser, deodorant, make-up, sun lotion or fake tan can cause discolouration. We would suggest showering before using the pool to avoid this. If the problem does occur you can use washing up liquid, stain remover or miracle pads to remove stains or marks.

We would not advise that the pool is left in direct sunlight. We would suggest setting the pool up in a shaded spot or using a gazebo or canopy to help protect the pool.

The pool liners have been tested for discolouration due to chemicals. We suggest that the pool is dip tested with the ClearWater test strips daily to check chemical levels.


Signs of mould on pool liner

Mould can occur if the pool is not completely dry when folded or put away. Humidity and dampness can cause mould to grow due to stagnant water.

By keeping the water treated with the correct chemical levels, drying the pool liner completely when it is packed away and maintaining the pool in a clean state when in use you should avoid issues such as this. However, should this problem arise, we would advise to use a solution of water and washing up liquid or stain remover to remove the mould.


If you need any further assistance please contact our Customer Care team below.

Oh no! We're sorry to hear that you are looking to make a warranty claim. Rest assured we'll do everything we can to ensure you can start using your Bestway product as soon as possible. Our troubleshooting steps will potentially fix the problem without needing to contact us, so we need you to read our guides first before submitting a warranty claim. You can find these within our Product Support section. If you have tried troubleshooting and it didn't solve the issue, please start our warranty claim procedure here.

To register your Bestway warranty, please complete our registration form here. For all information regarding your Bestway warranty, or for more T&Cs, please visit our warranties page here.

Get help with your Lay‑Z‑Spa inflatable. Find out the causes and the solutions to bulging, deflating and more.

Bulging Lay-Z-Spa inflatable lid Deflating Lay-Z-Spa inflatable lid Lay-Z-Spa inflatable lid is too small

Here you’ll find information to help you with your Lay‑Z‑Spa top cover, including causes and solutions to any issues you may encounter:

Lay-Z-Spa top cover flaking Lay-Z-Spa top cover discolouration Lay-Z-Spa top cover is too big Lay-Z-Spa top cover is too small Lay-Z-Spa top cover seams have split Lay-Z-Spa cover clips are broken

Here you’ll find information to help you with your Lay‑Z‑Spa liner, including causes and solutions to any issues you may encounter, such as bulging, deflating, leaking and much more.

Bulging Lay-Z-Spa Liner Deflating Lay-Z-Spa liner Water leaking from Lay-Z-Spa liner Lay-Z-Spa liner too small Lay-Z-Spa liner discolouration Unable to attach the Lay-Z-Spa pump Unable to remove Lay-Z-Spa filter housing Deflating seats / backrest (Lay-Z-Spa Maldives & Palma only)