


Product Support
Sand filter pump troubleshooting
Normally this is caused when the item is not regularly cleaned or maintained. Back flush the unit and replace the sand.
How to back flush:
- Turn power off (important, should not run the pump dry, will cause damage to pump)
- Close Port A using cap (switch from Port D to Port A basically)
- Attach hose to Port D
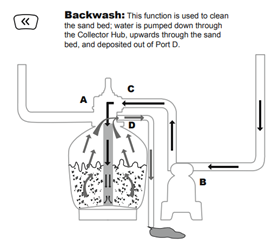
- Put the control valve to backwash position (<< symbol)
- Turn pump on until water turns clear (or around 3-5 mins)
- Turn pump off once water turns clear
- Remove old sand and refill, or rinse existing sand (water droplet symbol – rinse for 1 min)
- Once complete, remove cap from Port A and apply to Port D

We recommend completing the following steps to diagnose and resolve the issue causing sand to appear in your pool.
Step 1 – Is the sand being used too small?
The recommended is 0.45mm to 0.85mm #20 Silica Sand.
Step 2 – Move the control valve and perform the back flush to the filter function without stopping the sand filter
Turn off power to the Sand Filter (on/off switch on the pump) as changing the setting whilst running can cause damage to the pump; each setting will control the water flow differently.
Step 3 – Is the skimmer broken?
If this is the case we recommend replacing the skimmer.
Step 4 – Check if the level of the sand is too high
Check the level of the sand is between min and max lines
Step 5 – Has a back flush and rising been performed?
If not, perform the back flush and rinsing procedure. This is especially important to do when the sand is new.
How to back flush:
- Turn power off (important, should not run the pump dry, will cause damage to pump)
- Close Port A using cap (switch from Port D to Port A basically)
- Attach hose to Port D
- Put the control valve to backwash position (<< symbol)
- Turn pump on until water turns clear (or around 3-5 mins)
- Turn pump off once water turns clear
- Remove old sand and refill, or rinse existing sand (water droplet symbol – rinse for 1 min)
- Once complete, remove cap from Port A and apply to Port D

Step 1 – Is the filter dirty?
If this is the case please perform back wash and rising procedure.
How to back flush:
- Turn power off (important, should not run the pump dry, will cause damage to pump)
- Close Port A using cap (switch from Port D to Port A basically)
- Attach hose to Port D
- Put the control valve to backwash position (<< symbol)
- Turn pump on until water turns clear (or around 3-5 mins)
- Turn pump off once water turns clear
- Remove old sand and refill, or rinse existing sand (water droplet symbol – rinse for 1 min)
- Once complete, remove cap from Port A and apply to Port D

Step 2 – Has the sand bed calcified?
This is rare to happen as long as you are regularly rinsing the sand/backwashing the pump. It means that the sand clumps together and forms hard rocks so it can’t be filtered correctly. We recommend inspecting the sand and change if required.
Step 3 – Insufficient backwash
If after 3-5 minutes after the backwash procedure the water is still not running clear, repeat the process again. If you are struggling to get the water to run clear we recommend changing the sand all together.
Step 4 – Check if the pressure gauge is broken.
Step 1 – Is the filter dirty?
If it is we recommend completing the back flush procedure.
How to back flush:
- Turn power off (important, should not run the pump dry, will cause damage to pump)
- Close Port A using cap (switch from Port D to Port A basically)
- Attach hose to Port D
- Put the control valve to backwash position (<< symbol)
- Turn pump on until water turns clear (or around 3-5 mins)
- Turn pump off once water turns clear
- Remove old sand and refill, or rinse existing sand (water droplet symbol – rinse for 1 min)
- Once complete, remove cap from Port A and apply to Port D
Step 2 – Check if the control valve is set to filter function
The control valve will need to be set to the filter function to stop the warning sign bleeping.
Step 3 – Check if the hoses are broken
Step 4 – Is there a water flow?
Go through this checklist guide:
- Stopper plugs removed
- Control valve set to closed
- Strainer blocked
If this checklist does not resolve the problem the pump will need replacing. Replacements can be purchased here.
If you need any further assistance please contact our Customer Care team below.